For this next part of the briefing, I was given a project based on a theme of interiors and bearing the title 'prints of darkness'.
This brief could most definately be interpreted in a number of ways, however, the most obvious solution is to look towards gothic movements in art, culture and design. This take on the briefing title, however, is not a route which i am going to chose to follow. After mind mapping the possibilities, I have decided to narrow my subject matter to two themes: one being night sky landscape scenes; the other being medieval images and styles.
From my initial research (blogs to follow) i have chosen to use the medieval theme, as I feel it will work better with the type of artifact I have planned to create.
The 'Dark ages' is a term origionally given to the majority of the Middle ages, which began to be an popular term from the early 1600's. Times of Knights, armour, fair maidens and kingdoms are the first connotations I find from the phrase the 'dark ages', however, I do want to research futher into the art movements and imagery of the era, and the fashions, pattern and materials used so as to make my work for this projects reference as well as possible to the theme I have chosen.
The artifact that have chosen to create will is a patchwork quilt/cover. I plan to use various print techniques to create patterns and imagery refelcting my chosen theme, printing onto panels of material of various colours, and using a variety of sewing skills to create a full sized patchwork quilt cover from scatch. This should prove quite time consuming as i want to use a different image for each panel of material, which means designing and printing at least 10 different images. I want to use atleast two techniques of print anyway as to create different textures and results within the artifact. After reseaching and designing my images, I want to experiment printing them in various ways to achieve the best results.
This is a blg for me to communicate my print processes and evaluation throughout my Print processes module.
Thursday, 17 February 2011
Tuesday, 8 February 2011
FLOCKING AND FOILING:
Flocking and foiling is almost a completely different process to the rest of the print processes in that it is by applyng glue through the print screen stencil and using flocking and foil materials in the heat press that creates the effect.
SILK SCREEN PRINTING:
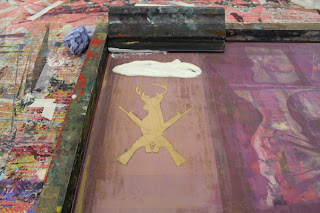
Slik screen printing with a photographically exposed screen is more of a slower process. For this i required a silk screen ready and coated in photographic emulsion, access to a light exposure unit, and a large scale photocopier to produce my logo onto assatate.
The first thing to do is produce my logo on assatate by photocopying onto assatate to my desired scale. Then I place the assatate logo with the silk screen in the light exposure unit to create my 'stencil'.
After finding the right colour of ink and mixing with Binder, I go on to pull ink over the entire logo stencil onto various papers and materials.
LINO PRINTING:
Lino printiong is probably the process that i got some of the best outcomes from. The types of materials and papers you can print onto in this process is more extensive than with Dry point printing, so in that respect i could work on printing my design with much more flexibility.
The process is started with a sheet of my desired size of lino, then with a lino tool, carving out the lino, either to create a negative or positive version of my logo. The print process litterally consists of rolling a light layer of ink over the lino block, placing over paper in the lino press, and releasing the machine several amounts of times to produce my required effect. Leaving to dry again for a good half a day atleast or untill dry.
DRY POINT PRINTING:
Dry point printing is probably the process that i have found the easiest, however I never used to like it because of how messy it can get!
To begin the process, I start with scratching/marking a design onto thick assatate, tracing over a design is the best way to do this. Then i take my assatate to the print room and cover all the lines with a mixture of printing ink and extender for inks. After thouroughly covering all the lines, i wipe the excess off and try to get the rest of the assatate as clean as i can. Then, after soaking papers and materials in water for a good 5-10 minutes, I place the etched and inked design onto the pre-soaked paper in the rolling press, roll the machine untill the plate has passed through, and carefully remove the finished piece and assatate.
Then leaving to dry for half a day to a day is ideal.
PRINT PROCESSES:
For this module i was given a brief to explore and experiment with various print techniques starting with an easy logo design.
The print processes i have explored so far are:
Dry point printing;
Lino printing;
Silk screen printing with a photographically exposed screen;
Flocking;
Foiling.
I have sucessful tests and outcomes for all of these techniques. Follow the blog for my experimentation and evauluation of my work.
The print processes i have explored so far are:
Dry point printing;
Lino printing;
Silk screen printing with a photographically exposed screen;
Flocking;
Foiling.
I have sucessful tests and outcomes for all of these techniques. Follow the blog for my experimentation and evauluation of my work.
Subscribe to:
Comments (Atom)


